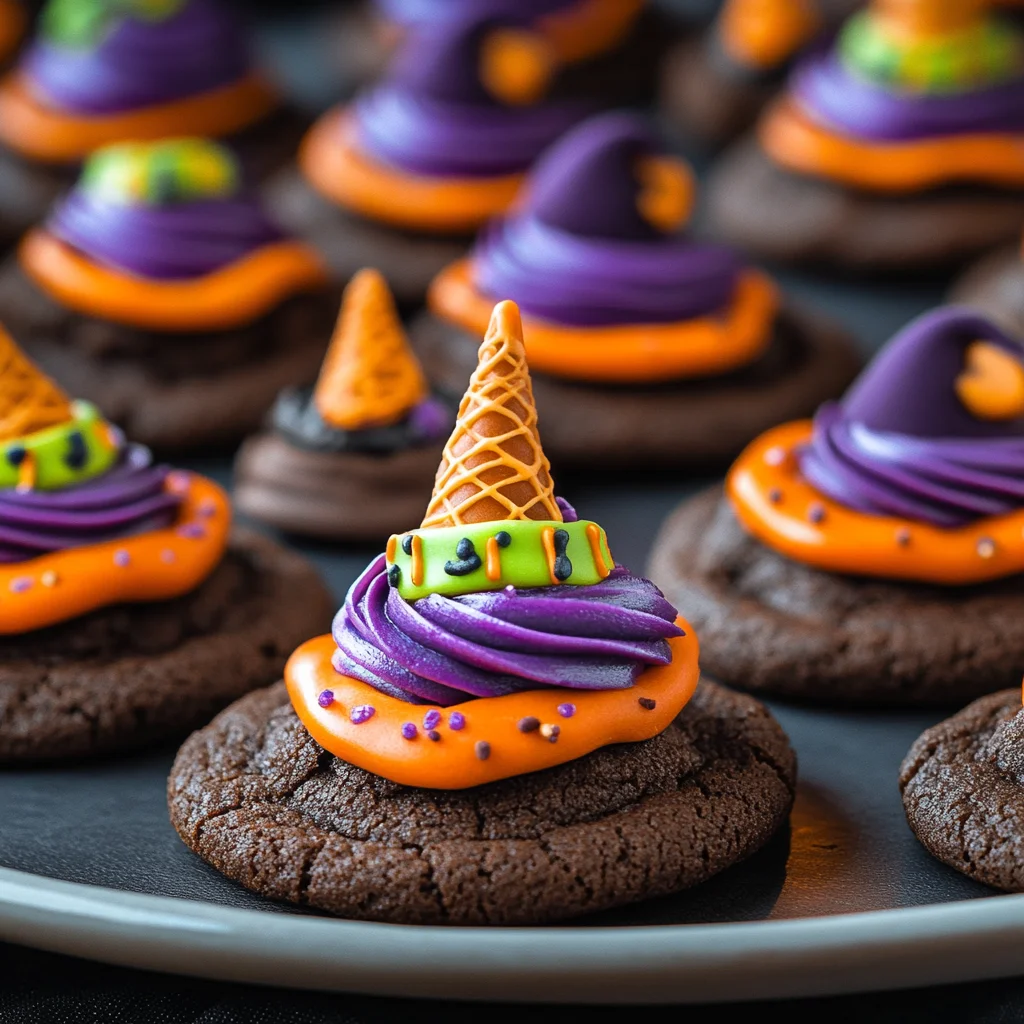
Halloween Witch Hat Cookies
These Halloween Witch Hat Cookies are the perfect treat to impress Halloween party guests. A fun project to do with the kids, these chocolaty cookies are easy to customize and will surely be a hit with all the little ghouls and goblins. With vibrant colors and whimsical designs, they make for an eye-catching dessert at any Halloween celebration.
Why You’ll Love This Recipe
- Fun Activity: Making these cookies is a great way to bond with family or friends while getting creative.
- Customizable: You can easily switch up the icing colors or cookie shapes to match your party theme.
- Delicious Flavor: The combination of chocolate cookies and sweet icing creates a delightful flavor that everyone will love.
- Eye-Catching Presentation: The unique witch hat shape makes these cookies stand out on any dessert table.
- Perfect for All Ages: Kids and adults alike will enjoy decorating and eating these festive treats.
Tools and Preparation
Before diving into the ingredients, let’s gather the essential tools needed for this recipe. Having everything ready will make the process smoother and more enjoyable.
Essential Tools and Equipment
- Cupcake Cones Baking Rack
- Cookie Sheet
- Parchment Paper
- Decorating Bags
- Icing Tips (2B, 3)
- Mixing Bowls
- Knife
Importance of Each Tool
- Cupcake Cones Baking Rack: This tool holds the sugar cones securely in place while baking, ensuring even cooking.
- Decorating Bags: Using decorator bags allows for precision when piping icing onto your cookies, creating beautiful designs.
- Icing Tips: Various tips help achieve different shapes and designs in your icing work, adding creativity to your decorations.

Ingredients
For the Cake Base
- Favorite Cake Mix or Try Wilton’s Chocolate Cake Recipe
For the Cookies
- Store Bought Chocolate Cookies or Try This Recipe from Wilton
For the Icing Colors
- Lemon Yellow Icing Color
- Black Color Mist Food Coloring Spray
- Rose Icing Colors Pink Food Coloring
- Violet Icing Color, Gel Food Coloring
- Golden Yellow Icing Color
- Orange Icing Color
For Assembly
- Sugar Cones
- Creamy White Decorator Icing, 4 lb. Tub
How to Make Halloween Witch Hat Cookies
Step 1: Prepare & Bake the Cones
- Prepare your cake mix according to the instructions provided in your chosen recipe.
- Place the Cupcake Cones Baking Rack on a cookie sheet.
- Insert sugar cones into the rack and fill each cone with about 2 tablespoons of cake batter.
- Bake as directed in your cake mix recipe and allow them to cool completely.
Step 2: Spray the Cones
- Use a knife to trim any risen cake that exceeds the top of the cone if necessary.
- Place cones wide side down on parchment paper.
- Spray them with Black Color Mist food coloring evenly.
- Allow them to dry for about 10 to 15 minutes.
Step 3: Tint the Icing & Prepare the Bags
- Tint one cup of creamy white decorator icing orange.
- Combine violet and rose icing colors to tint another cup purple.
- Prepare two decorating bags with tip 2B filled with orange and purple icing respectively.
- Tint ¼ cup of creamy white decorator icing yellow by mixing golden yellow and lemon yellow colors in another bag with tip 3 attached.
Step 4: Assemble the Witch Hats
- Pipe a small amount of orange icing onto a chocolate cookie’s center; place a cone on top.
- With tip facing out, pipe an orange band around half of the cones; smooth it using a spatula.
- Repeat this process using purple icing on the remaining cookies and cones.
- Let them set for about 15 to 20 minutes before adding finishing touches.
- Use yellow tinted icing in bag with tip 3 attached to pipe a buckle around each hat band; let set for another 15 to 20 minutes before enjoying!
How to Serve Halloween Witch Hat Cookies
These Halloween Witch Hat Cookies are a delightful addition to any spooky gathering. They bring fun and festivity to your dessert table. Here are some creative ways to serve them:
Individual Treat Bags
- Use clear bags tied with orange or purple ribbons to create individual servings. This makes it easy for guests to grab a treat.
Cookie Platter
- Arrange the witch hat cookies on a festive platter surrounded by Halloween-themed decorations, such as mini pumpkins or spider webs.
Halloween Party Favors
- Wrap each cookie in cellophane and attach a thank-you tag for party guests to take home as a sweet reminder of the celebration.
Themed Dessert Table
- Incorporate the cookies into a larger dessert table featuring other Halloween treats, like ghost-shaped cupcakes or spooky brownies for an eye-catching display.
Milk Pairing
- Serve the cookies alongside glasses of chilled milk, chocolate milk, or plant-based alternatives for dipping and added enjoyment.
How to Perfect Halloween Witch Hat Cookies
To achieve the best results with your Halloween Witch Hat Cookies, consider these helpful tips:
- Use Fresh Ingredients: Ensure all your ingredients, especially the cake mix and icing, are fresh for optimal flavor and texture.
- Pipe Smoothly: Practice piping techniques on parchment paper before decorating your cookies. This will help you achieve neat designs on the cones.
- Let Icing Set: Allow each layer of icing to dry before adding more decorations. This prevents colors from bleeding into one another.
- Experiment with Colors: Don’t hesitate to mix colors creatively. For example, try different shades of green or blue for unique hats.
Best Side Dishes for Halloween Witch Hat Cookies
Pair these enchanting cookies with some equally festive side dishes. Here are some great ideas:
- Pumpkin Soup: A creamy pumpkin soup served in small cups adds warmth and comfort to your Halloween spread.
- Spooky Veggie Platter: Create a platter using cut veggies shaped like ghosts or pumpkins, served with a tangy dip for a healthy option.
- Mummy Hot Dogs: Wrap turkey hot dogs in crescent roll dough and bake until golden brown to create fun mummy shapes that kids will love.
- Witch’s Brew Punch: Mix fruit juices and soda in a cauldron-like bowl for a refreshing drink that matches the theme perfectly.
- Ghostly Guacamole: Shape guacamole into ghostly figures using sour cream for eyes and serve with tortilla chips for a tasty appetizer.
- Caramel Apples: Offer caramel-coated apples, perhaps decorated with sprinkles or nuts, as a classic fall treat that complements the cookies well.
- Spider Web Brownies: Serve fudgy brownies topped with white icing spider webs for an indulgent dessert that pairs perfectly with the witch hat cookies.
Common Mistakes to Avoid
When making Halloween Witch Hat Cookies, it’s easy to overlook some crucial steps. Here are common mistakes to watch for:
- Skipping the Cooling Step: Allow the baked cones to cool completely before decorating. This will prevent the icing from melting and losing shape.
- Not Using a Decorating Bag: Using a spoon instead of a decorating bag can lead to messy icing application. Invest in piping bags for better control and design.
- Ignoring Color Mixing Instructions: Failing to mix your food colors properly can result in dull shades. Make sure to blend colors thoroughly for vibrant results.
- Overfilling the Cones: Filling sugar cones too much with cake batter can cause overflow during baking. Aim for just 2 tablespoons of batter for a perfect fit.
- Rushing the Drying Time: Skipping the drying time after spraying or icing can lead to smudged designs. Be patient and let each layer dry adequately.
Storage & Reheating Instructions
Refrigerator Storage
- Store cookies in an airtight container.
- They will last up to 5 days in the fridge.
Freezing Halloween Witch Hat Cookies
- Wrap cookies individually in plastic wrap.
- Place them in a freezer-safe container for up to 3 months.
Reheating Halloween Witch Hat Cookies
- Oven: Preheat oven to 350°F (175°C). Place cookies on a baking sheet and heat for about 5-7 minutes.
- Microwave: Heat cookies individually on a microwave-safe plate for about 10-15 seconds.
- Stovetop: Use a non-stick pan over low heat, covering it with a lid for about 5 minutes, checking frequently.
Frequently Asked Questions
Here are some common questions regarding Halloween Witch Hat Cookies:
How do I make Halloween Witch Hat Cookies gluten-free?
You can use a gluten-free cake mix instead of regular cake mix. Ensure all other ingredients are also gluten-free.
Can I customize the colors of my witch hats?
Absolutely! Use any food coloring you like to create unique designs that match your Halloween theme.
How long does it take to make Halloween Witch Hat Cookies?
The total time is around 1 hour and 45 minutes, including preparation and cooling time.
Are there alternatives to sugar cones?
Yes! You can use mini ice cream cones as an alternative if you prefer a different base for your witch hats.
Can kids help with making these cookies?
Definitely! This is a fun activity for kids, from mixing batter to decorating their own witch hats.
Final Thoughts
Halloween Witch Hat Cookies are not only delightful treats but also a fantastic way to engage creativity during the spooky season. With various customization options available, you can tailor these cookies to suit your taste and style. Gather your ingredients, invite friends or family, and enjoy creating this festive dessert together!
Halloween Witch Hat Cookies

Get ready to add some spooky fun to your Halloween festivities with these delightful Halloween Witch Hat Cookies! Perfect for parties or a creative family baking session, these whimsical treats feature chocolate cookies topped with colorful icing and sugar cones shaped like witch hats. Their vibrant colors and playful design make them a hit among kids and adults alike. Plus, the easy customization options allow you to match them to your Halloween theme. Gather your loved ones, let your imagination run wild, and enjoy creating these eye-catching desserts that are sure to impress!
- Prep Time: 30 minutes
- Cook Time: 15 minutes
- Total Time: 45 minutes
- Yield: Approximately 12 cookies
- Category: Dessert
- Method: Baking
- Cuisine: American
Ingredients
- Favorite chocolate cake mix
- Store-bought chocolate cookies or homemade chocolate cookie recipe
- Sugar cones
- Creamy white decorator icing (4 lb tub)
- Food coloring: lemon yellow, black color mist spray, rose pink, violet, golden yellow, orange
Instructions
- Prepare the cake mix according to package directions and fill sugar cones with about 2 tablespoons of batter.
- Bake in a Cupcake Cones Baking Rack at the recommended temperature until cooked through; cool completely.
- Trim any excess cake from the cones and spray with black food coloring; let dry.
- Tint creamy white icing in orange and purple; pipe onto cookies with decorating bags.
- Assemble by placing cones on cookies and adding decorative details with icing.
Nutrition
- Serving Size: 1 cookie (40g)
- Calories: 180
- Sugar: 12g
- Sodium: 110mg
- Fat: 7g
- Saturated Fat: 3g
- Unsaturated Fat: 4g
- Trans Fat: 0g
- Carbohydrates: 27g
- Fiber: 1g
- Protein: 2g
- Cholesterol: 0mg