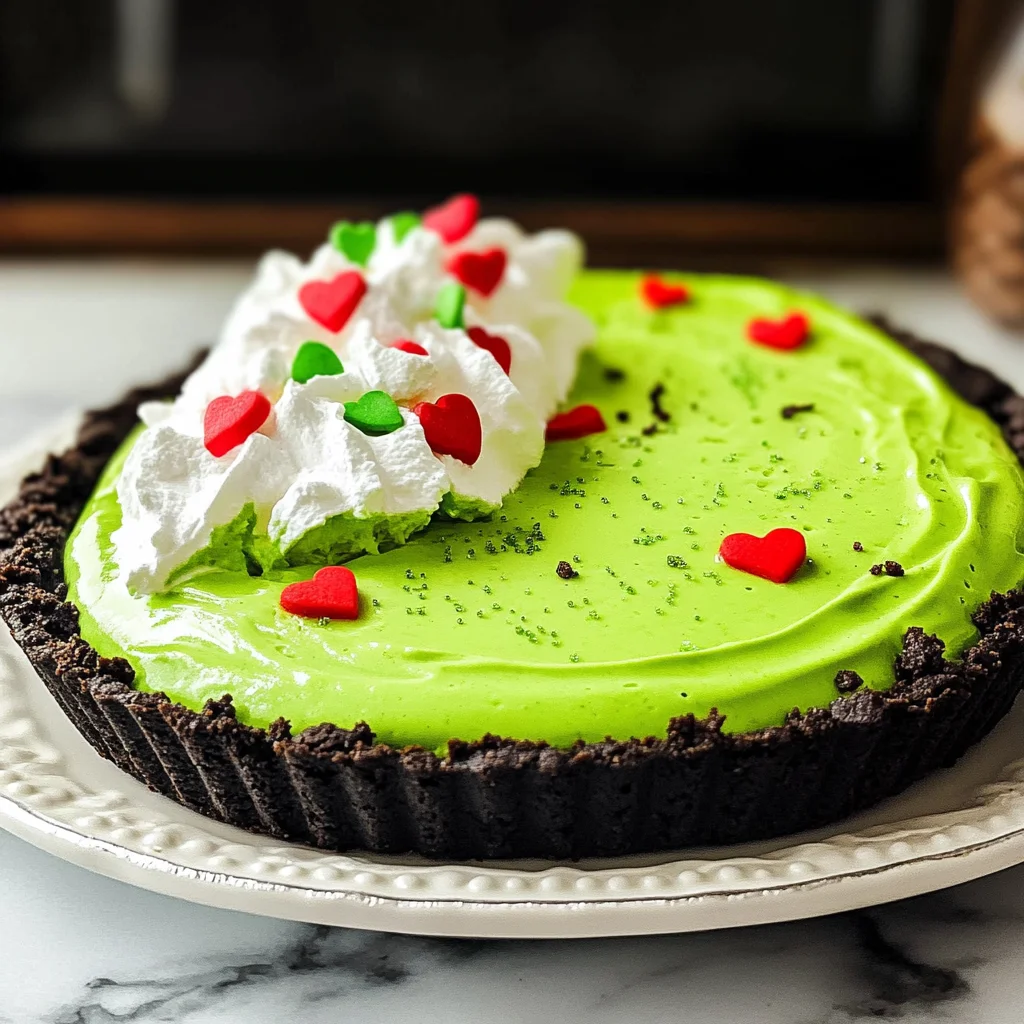
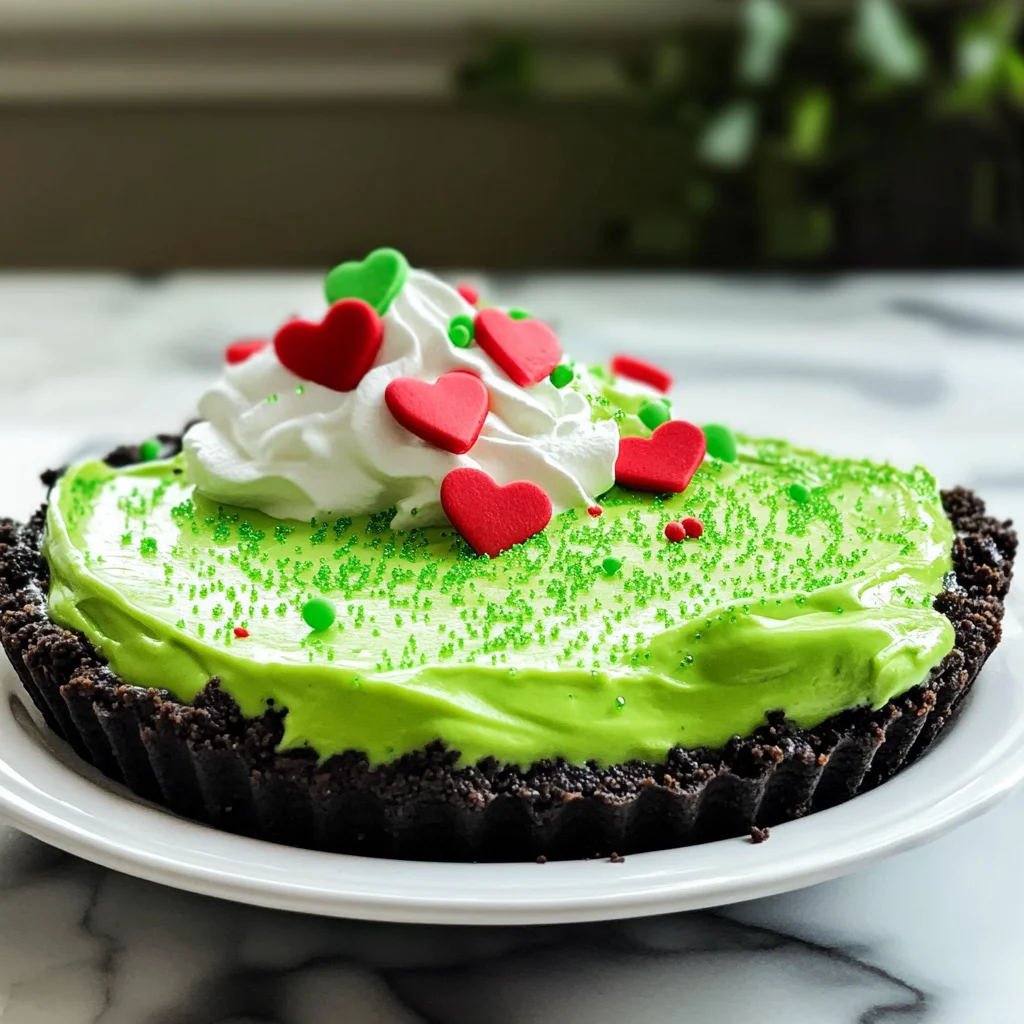
No Bake Grinch Pie
Get This Recipe In Your Inbox
Enter your email address and we'll send it straight to your inbox.
This No Bake Grinch Pie is the perfect festive dessert that brings joy to any celebration. With its vibrant colors and delightful flavors, it’s an ideal treat for Christmas gatherings or holiday parties. The combination of creamy white chocolate pudding and a crunchy Oreo crust makes it a crowd-pleaser, sure to impress family and friends. Plus, it’s incredibly easy to whip up with minimal prep time, allowing you to enjoy the festivities without spending hours in the kitchen!
Why You’ll Love This Recipe
- Quick to Prepare: With just five minutes of prep time, this pie is a breeze to make.
- No Baking Required: Skip the oven and still create a stunning dessert that everyone will love.
- Festive Appeal: The bright green color and heart sprinkles make it visually appealing for the holidays.
- Versatile Dessert: Perfect for Christmas parties, potlucks, or as a fun family treat.
- Kid-Friendly: Easy enough for kids to help with, making it a fun family activity.
Tools and Preparation
Having the right tools on hand can make your baking experience much smoother. Here’s what you’ll need for your No Bake Grinch Pie.
Essential Tools and Equipment
- Mixing bowl
- Whisk or electric mixer
- Measuring cups
- Spatula
- Refrigerator
Importance of Each Tool
- Mixing bowl: A large bowl allows for ample space when combining ingredients without spills.
- Whisk or electric mixer: Ensures your pudding reaches the perfect creamy consistency quickly.
- Measuring cups: Accurate measurements are key for achieving the desired taste and texture.
Ingredients
For the Crust
- 1 Oreo pie crust
For the Filling
- 1 box white chocolate pudding (3.9 oz)
- 2 Cups 2% milk (Make sure it is cold)
- 1/2 container Cool-Whip
- 2-3 drops neon green gel food coloring
- 1-2 drops green food coloring
For the Toppings
- 1/2 cup green sanding sugar
- 1/2 cup mini red heart sprinkles
- 1/2 cup large red heart sprinkles
How to Make No Bake Grinch Pie
Step 1: Prepare the Pudding
- In a mixing bowl, combine the white chocolate pudding mix and cold milk.
- Add in the neon green gel food coloring and regular green food coloring.
- Use a whisk or an electric mixer to beat until it thickens and forms soft peaks.
Step 2: Assemble the Pie
- Scoop the prepared pudding into the Oreo pie crust.
- Spread it evenly across the crust using a spatula.
Step 3: Chill
- Cover the pie with plastic wrap.
- Refrigerate for about 3 hours until set.
Step 4: Add Toppings
- Once set, remove from refrigerator.
- Top with Cool-Whip evenly over the pudding layer.
- Sprinkle green sanding sugar and mini red heart sprinkles on top.
Step 5: Serve
- Just before serving, place one large red heart sprinkle in the center as a finishing touch.
- Cut into slices and enjoy!
With this easy recipe, your No Bake Grinch Pie is ready to spread holiday cheer! Enjoy each delicious bite that will surely warm your heart this festive season!
How to Serve No Bake Grinch Pie
Serving No Bake Grinch Pie is a delightful experience that can enhance any festive gathering. This visually appealing dessert not only tastes great but also brings a cheerful vibe to your table.
Individual Slices
- Serve each slice on a decorative plate for an elegant presentation.
- Add a dollop of extra Cool-Whip on top for added creaminess.
With Fresh Berries
- Pair the pie with fresh strawberries or raspberries to add a tart contrast.
- Arrange berries around the pie for a colorful display.
Festive Beverage Pairing
- Serve with a refreshing mint lemonade or holiday-themed mocktail.
- The bright flavors will complement the sweetness of the pie beautifully.
Ice Cream Scoop
- Offer a scoop of vanilla or mint ice cream alongside each slice.
- The cold, creamy texture pairs well with the pie’s rich flavor.
How to Perfect No Bake Grinch Pie
To ensure your No Bake Grinch Pie turns out perfectly every time, consider these helpful tips.
- Chill your ingredients: Make sure your milk is very cold before mixing. This helps the pudding set properly.
- Use fresh Cool-Whip: Make sure your Cool-Whip is fresh for the best texture and flavor.
- Mix thoroughly: When combining the pudding mix and milk, whisk until fully blended to avoid lumps.
- Add color gradually: When using food coloring, start with fewer drops and add more until you achieve the desired shade of green.
- Let it set: Refrigerate your pie long enough for it to set completely; aim for at least 3 hours.
- Decorate right before serving: For the best look, add sprinkles and toppings just before serving to keep them vibrant and crunchy.
Best Side Dishes for No Bake Grinch Pie
Pairing side dishes with your No Bake Grinch Pie can elevate your holiday meal. Here are some delightful options that complement this festive dessert well.
-
Fruit Salad
A mix of seasonal fruits like oranges, apples, and grapes adds freshness and lightness. -
Cheese Platter
Include assorted cheeses with crackers; the savory notes balance the sweetness of the pie. -
Veggie Sticks with Dip
Crisp vegetables like carrots and celery served with hummus offer a crunchy contrast. -
Christmas Cookies
A selection of holiday-themed cookies provides additional sweet treats for guests to enjoy. -
Nut Mix
A bowl of spiced nuts can provide a crunchy snack option that complements dessert nicely. -
Chocolate Fondue
Set up a chocolate fondue station where guests can dip fruits or marshmallows, adding another layer of indulgence.
Common Mistakes to Avoid
Avoiding mistakes can make your No Bake Grinch Pie even more delightful and festive.
- Ignoring the temperature of the milk: Always use cold milk for your pudding. Warm milk can prevent the pudding from setting properly.
- Overmixing the pudding: Mix just until combined and soft peaks form. Overmixing can lead to a grainy texture.
- Skipping refrigeration time: Allowing the pie to chill for at least 3 hours is crucial for a perfect texture. Don’t rush this step!
- Forgetting the sprinkles: The festive look of the pie comes from the toppings. Make sure to add them just before serving for a vibrant presentation.
- Not using enough food coloring: To achieve that vibrant Grinch green, use both neon and regular green food coloring. Adjust according to your preference.
Storage & Reheating Instructions
Refrigerator Storage
- Store any leftovers in an airtight container.
- Consume within 3 days for the best taste and texture.
Freezing No Bake Grinch Pie
- Freezing is not recommended as it may alter the texture of the pudding.
- If necessary, wrap tightly in plastic wrap before placing in a freezer-safe container.
Reheating No Bake Grinch Pie
- Oven: Not recommended due to the pie’s delicate ingredients.
- Microwave: Heat individual slices on low power for about 10-15 seconds if needed.
- Stovetop: Not applicable for this recipe; serve chilled directly from refrigeration.
Frequently Asked Questions
Here are some common questions about making and enjoying No Bake Grinch Pie.
Can I use different flavors of pudding?
Absolutely! While white chocolate provides a festive touch, feel free to experiment with other flavors such as vanilla or chocolate.
How can I make this dessert more festive?
You can add holiday-themed toppings like edible glitter or themed candies. Customizing with seasonal decorations adds extra cheer!
Is there a way to make this pie vegan?
To create a vegan version, substitute dairy milk with almond or coconut milk and use coconut whipped cream instead of Cool-Whip.
How do I ensure my pie sets properly?
Make sure your milk is cold when preparing the pudding and allow sufficient refrigeration time. This helps achieve that perfect consistency.
Can I prepare this pie in advance?
Yes! This No Bake Grinch Pie is ideal for making ahead of time, allowing you more freedom on busy holiday days.
Final Thoughts
This No Bake Grinch Pie is not only simple but also brings joy with its vibrant colors and delicious flavors. It’s perfect for holiday gatherings or any festive occasion. Feel free to customize it with various toppings, making it uniquely yours!
No Bake Grinch Pie

Indulge in the festive spirit with this delightful No Bake Grinch Pie, a perfect treat for your holiday gatherings. This vibrant dessert features a creamy white chocolate pudding filling nestled in a crunchy Oreo crust, topped with colorful sprinkles that bring joy to every celebration. With only five minutes of preparation and no baking required, it allows you to spend more time enjoying the festivities with family and friends. Ideal for Christmas parties or as a fun family activity, this pie not only tantalizes taste buds but also lights up your dessert table with its cheerful appearance.
- Prep Time: 5 minutes
- Cook Time: None
- Total Time: 0 hours
- Yield: Serves 8
- Category: Dessert
- Method: No Bake
- Cuisine: American
Ingredients
- 1 Oreo pie crust
- 1 box white chocolate pudding (3.9 oz)
- 2 cups 2% milk (cold)
- 1/2 container Cool-Whip
- Neon green gel food coloring
- Green food coloring
- Green sanding sugar
- Mini red heart sprinkles
- Large red heart sprinkles
Instructions
- In a mixing bowl, combine the white chocolate pudding mix and cold milk.
- Add neon green and regular green food coloring.
- Whisk or use an electric mixer until thickened and soft peaks form.
- Pour the mixture into the Oreo crust and spread evenly.
- Cover with plastic wrap and refrigerate for about 3 hours to set.
- Once set, top with Cool-Whip and sprinkle with green sanding sugar and heart sprinkles before serving.
Nutrition
- Serving Size: 1 slice (approximately 150g)
- Calories: 210
- Sugar: 19g
- Sodium: 250mg
- Fat: 10g
- Saturated Fat: 5g
- Unsaturated Fat: 4g
- Trans Fat: 0g
- Carbohydrates: 29g
- Fiber: <1g
- Protein: 2g
- Cholesterol: 15mg
Get This Recipe In Your Inbox
Enter your email address and we'll send it straight to your inbox.