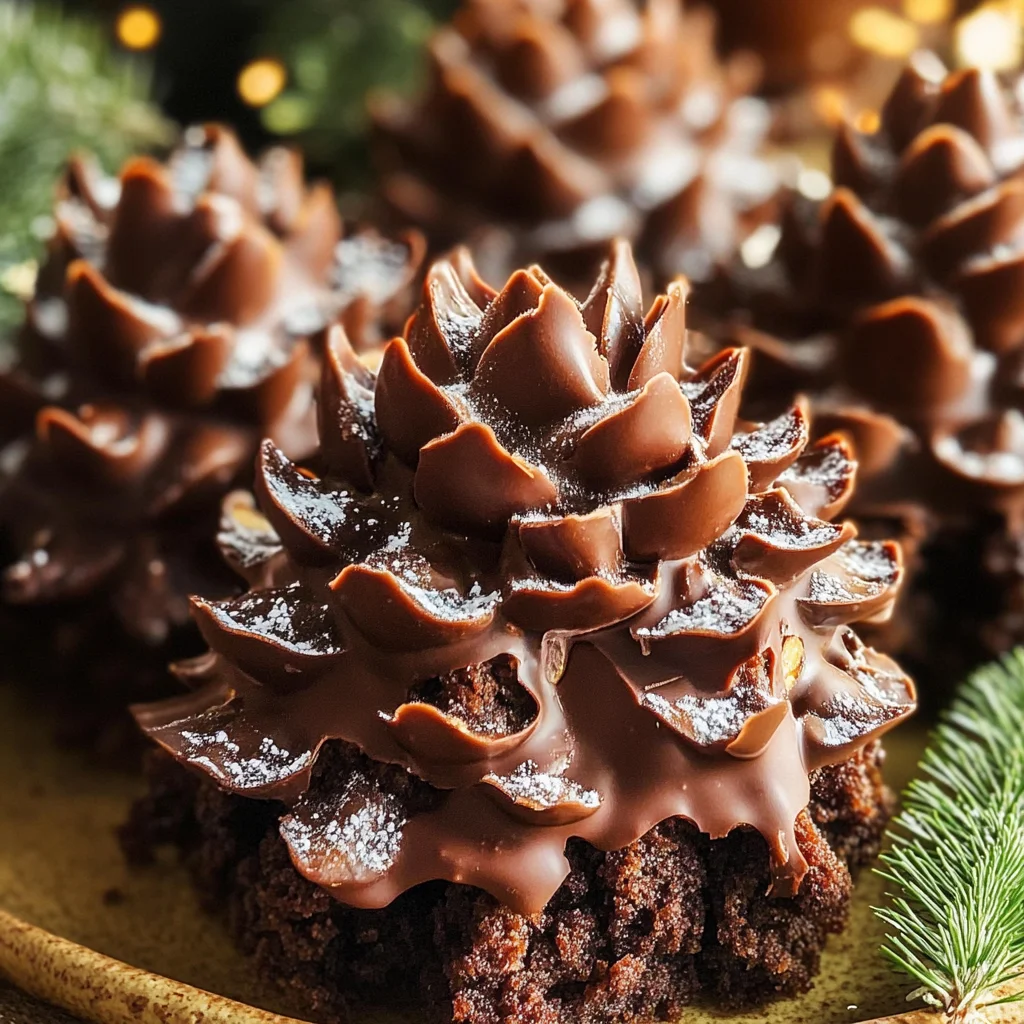
Viral Pine Cone Brownies
Get This Recipe In Your Inbox
Enter your email address and we'll send it straight to your inbox.
These Viral Pine Cone Brownies are the perfect festive treat to brighten up your holiday gatherings! Not only do they look adorable, but they also bring a delightful mix of flavors and textures that everyone will love. They’re an excellent choice for any special occasion, from family get-togethers to school parties. Plus, these brownies are gluten-free, dairy-free, and refined sugar-free, making them a guilt-free indulgence that all guests can enjoy.
Why You’ll Love This Recipe
- Fun to Make: These brownies are a great project for kids and adults alike. Shaping the brownie cones is an enjoyable activity for everyone involved.
- Versatile Ingredients: You can easily swap out ingredients based on your preferences or dietary needs without losing the charm of this recipe.
- Impressive Presentation: The pine cone shape makes for an eye-catching dessert that’s sure to impress your friends and family during the holidays.
- Healthier Alternative: These brownies are made without refined sugars or dairy, making them a healthier dessert option that still satisfies your sweet tooth.
- Quick Preparation: Using a boxed brownie mix simplifies the process, allowing you to whip up these treats in no time!
Tools and Preparation
To create these delightful Pine Cone Brownies, gather some essential tools. Having the right equipment will make the process smoother and more enjoyable.
Essential Tools and Equipment
- Mixing bowl
- Baking pan
- Parchment paper
- Microwave-safe bowl (or double boiler)
- Freezer-safe tray
Importance of Each Tool
- Mixing bowl: A sturdy mixing bowl is essential for combining your brownie ingredients smoothly.
- Baking pan: A good-quality baking pan ensures even cooking and helps achieve that perfect brownie texture.
- Parchment paper: Lining your baking pan with parchment paper prevents sticking and makes cleanup a breeze.
Ingredients
For these delicious Viral Pine Cone Brownies, you’ll need:
Brownie Base
- 1 GF/Grain free boxed brownie mix (and whatever ingredients it requires; I love Simple Mills)
Pine Cone Decoration
- 1 cup sliced almonds (can substitute with cereal flakes instead)
- 9 oz chocolate chips
- 1 tsp coconut oil
- Powdered Sugar or Powdered Monk fruit
How to Make Viral Pine Cone Brownies
Step 1: Prepare the Brownie Mix
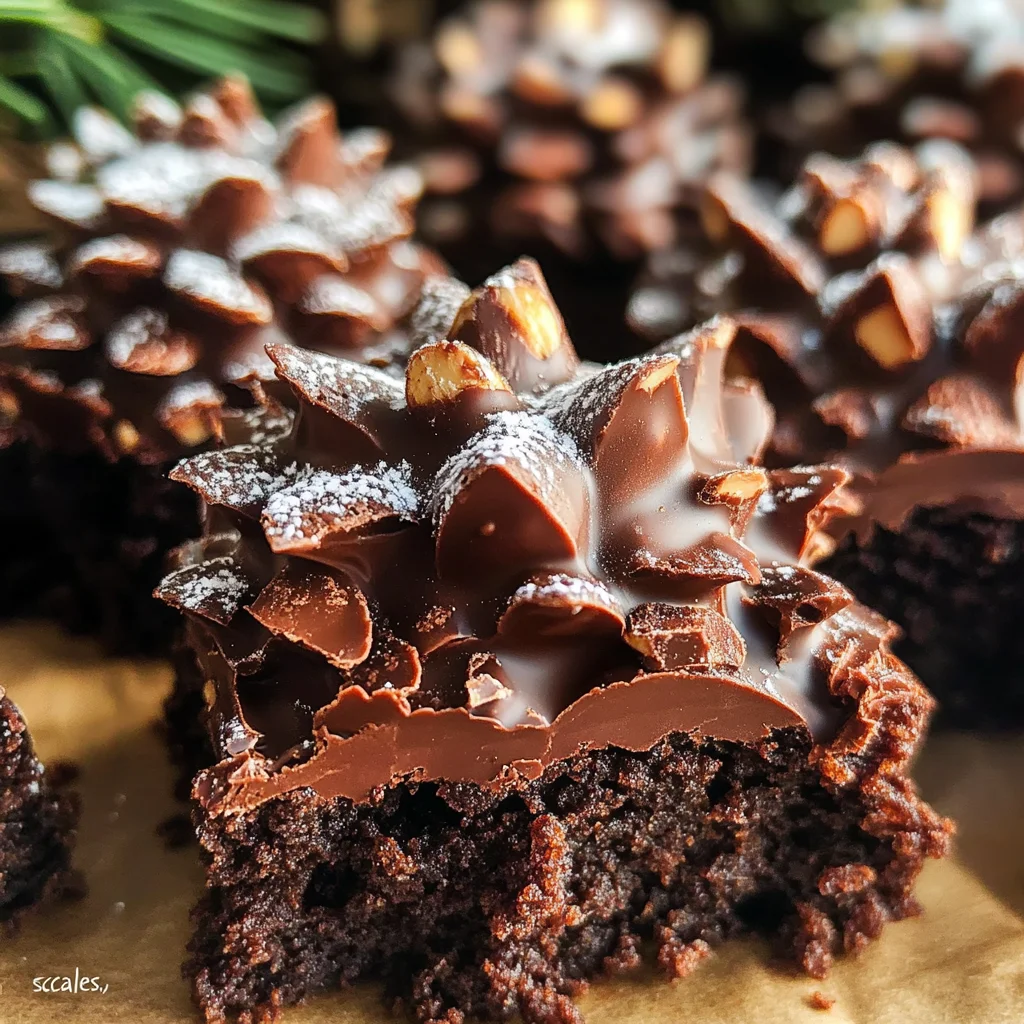
Make your brownie mix according to the package instructions. Ensure you don’t overbake them; you want them slightly gooey in the middle for easier shaping. After baking, let them cool down for about 10 minutes but not too long as they should remain soft.
Step 2: Shape the Brownies
Take the cooled brownie mixture and form it into about 12 cone shapes, similar to how you would shape cake pops.
Step 3: Decorate with Almonds
Carefully place the almond slices (or cereal flakes) around the brownie cones. This mimics the scales of a pine cone, making them look full and festive.
Step 4: Freeze for Firmness
Place the decorated pine cones on a parchment-lined sheet pan and freeze them for about 30 minutes to help solidify their shape.
Step 5: Melt Chocolate Coating
Melt the chocolate chips with coconut oil in a microwave-safe bowl in 30-second increments until fully melted. Alternatively, use a double boiler if preferred.
Step 6: Coat Each Pine Cone
Remove the pine cones from the freezer and carefully coat each one with melted chocolate. Return them to the parchment paper to allow setting.
Step 7: Finish with Powdered Sugar
Sprinkle powdered sugar on top of each pine cone brownie for an extra frosted appearance before serving. Enjoy your charming dessert!
How to Serve Viral Pine Cone Brownies
These Viral Pine Cone Brownies are not only adorable but also versatile for serving. Whether you’re hosting a holiday gathering or a casual get-together, here are some fun serving suggestions to elevate your dessert experience.
For a Festive Display
- Arrange the brownies on a decorative platter and surround them with fresh pine branches for a holiday-themed touch.
- Use small, colorful plates to serve individual brownies, adding a unique twist to each guest’s experience.
With Ice Cream
- Pair these brownies with a scoop of dairy-free vanilla ice cream for an indulgent treat that balances the rich chocolate flavor.
- Consider drizzling some fruit juice over the ice cream for added sweetness and freshness.
On Snack Tables
- Place your Pine Cone Brownies on a snack table alongside fruit skewers or nut mixes for a delightful contrast.
- Offer small forks or toothpicks for easy serving, making it fun and interactive for guests.
As Party Favors
- Wrap individual brownies in clear cellophane and tie with festive ribbons. These make delightful take-home gifts for guests to enjoy later.
- Include a small tag with the recipe so others can recreate this fun dessert at home!
How to Perfect Viral Pine Cone Brownies
To ensure your Viral Pine Cone Brownies turn out perfectly every time, keep these tips in mind.
- Use quality ingredients: Choose high-quality chocolate chips and almond slices for the best flavor and texture.
- Don’t overbake: Keep an eye on the brownies while baking; they should be gooey in the middle to hold their shape when forming cones.
- Chill before coating: Freezing the brownie cones before dipping them in chocolate helps maintain their shape and prevents breaking.
- Experiment with toppings: Feel free to add nuts, sprinkles, or dried fruits along with powdered sugar for extra decoration and taste.
- Customize shapes: If you want variety, try making different sizes of cones or even combining multiple cones together for larger pine trees.
Best Side Dishes for Viral Pine Cone Brownies
Pairing side dishes with your Viral Pine Cone Brownies can enhance the overall dessert experience. Here are some great options to consider:
- Fruit Salad: A refreshing mix of seasonal fruits like berries and citrus complements the chocolate richness beautifully.
- Nut Mix: A blend of roasted nuts provides a crunchy texture contrast that balances the soft brownies.
- Dairy-Free Whipped Cream: Light and airy, this topping adds a creamy element that pairs well with the brownies’ richness.
- Chocolate Sauce: Offer warm chocolate sauce on the side for those who want an extra touch of decadence.
- Fresh Berries: Serve alongside fresh raspberries or strawberries; their tartness cuts through the sweetness of the brownies nicely.
- Coconut Yogurt: A dollop of coconut yogurt adds creaminess while keeping everything dairy-free and delicious.
Common Mistakes to Avoid
When making your Viral Pine Cone Brownies, it’s easy to slip up. Here are some common mistakes and how to avoid them.
- Overbaking the Brownies: If you bake your brownies too long, they will become dry and difficult to shape. Keep an eye on the timer and check for a gooey center.
- Using Stale Ingredients: Fresh ingredients are key. Ensure your brownie mix and chocolate chips are within their expiration date for the best flavor.
- Not Cooling Properly: Allowing the brownies to cool too much can make them hard. Let them cool just enough so they are manageable but still warm.
- Skipping the Freezing Step: Freezing the brownie cones helps them hold their shape while coating with chocolate. Don’t skip this step!
- Rushing the Chocolate Coating: If the chocolate is too hot or if you rush, it can melt the brownie. Allow it to cool slightly before dipping for a smooth finish.
Storage & Reheating Instructions
Refrigerator Storage
- Store in an airtight container for up to 5 days.
- Place parchment paper between layers to prevent sticking.
Freezing Viral Pine Cone Brownies
- Wrap each brownie cone individually in plastic wrap before placing in a freezer-safe bag.
- They can be frozen for up to 3 months.
Reheating Viral Pine Cone Brownies
- Oven: Preheat to 350°F (175°C) and heat for about 10 minutes until warmed through.
- Microwave: Heat for 20-30 seconds on medium power; check frequently to avoid overheating.
- Stovetop: Use a non-stick pan on low heat, cover with a lid for a few minutes until warm.
Frequently Asked Questions
Here are some common questions about making Viral Pine Cone Brownies.
Can I make these brownies gluten-free?
Yes! Use a gluten-free boxed brownie mix like Simple Mills as mentioned in the recipe.
How do I customize my pine cone brownies?
You can add various toppings like sprinkles or different nuts for a personalized touch!
What’s the best way to store leftovers?
Store them in an airtight container in the refrigerator for up to five days or freeze for longer storage.
Are these brownies dairy-free?
Absolutely! These Viral Pine Cone Brownies are designed to be dairy-free using plant-based alternatives.
Final Thoughts
These Viral Pine Cone Brownies are not only adorable but also versatile enough for any festive occasion. Customize them with your favorite toppings or use different nut varieties. Give this fun recipe a try and enjoy creating these delightful treats with family and friends!
Viral Pine Cone Brownies
Viral Pine Cone Brownies are the ultimate festive treat that add a whimsical touch to your holiday gatherings! These adorable brownie cones, adorned with almond ‘scales,’ are not only visually stunning but also packed with delightful flavors. Perfect for any occasion—be it family celebrations or school parties—these brownies are gluten-free, dairy-free, and refined sugar-free, making them a guilt-free indulgence everyone can enjoy. Easy to make and even more fun to decorate, they’re sure to impress your guests while satisfying your sweet cravings. Dive into creating these charming desserts that are as enjoyable to make as they are to eat!
- Prep Time: 20 minutes
- Cook Time: 20 minutes
- Total Time: 40 minutes
- Yield: Approximately 12 servings 1x
- Category: Dessert
- Method: Baking
- Cuisine: American
Ingredients
- 1 GF/Grain free boxed brownie mix
- 1 cup sliced almonds or cereal flakes
- 9 oz chocolate chips
- 1 tsp coconut oil
- Powdered sugar or powdered monk fruit for decoration
Instructions
- Prepare the brownie mix according to package instructions without overbaking; aim for a slightly gooey center.
- Once cooled for about 10 minutes, shape the brownie into approximately 12 cone shapes.
- Decorate each cone with almond slices or cereal flakes to resemble pine cone scales.
- Freeze the decorated cones on a parchment-lined tray for about 30 minutes.
- Melt chocolate chips with coconut oil in a microwave-safe bowl until smooth.
- Remove the cones from the freezer and coat each one with melted chocolate before returning them to the parchment paper to set.
- Finally, sprinkle with powdered sugar for a frosted look before serving.
Nutrition
- Serving Size: 1 serving
- Calories: 180
- Sugar: 6g
- Sodium: 80mg
- Fat: 8g
- Saturated Fat: 4g
- Unsaturated Fat: 4g
- Trans Fat: 0g
- Carbohydrates: 26g
- Fiber: 4g
- Protein: 2g
- Cholesterol: 0mg
Get This Recipe In Your Inbox
Enter your email address and we'll send it straight to your inbox.